 ®
®
Faximum ELS/PLUS Reference Manual
for SCO OpenServer 5 - Release 2.1 - HTML Edition - Draft 1
[Top] [Prev] [Next] [Bottom]
The Admin Menu
This chapter describes the Faximum Administration menu.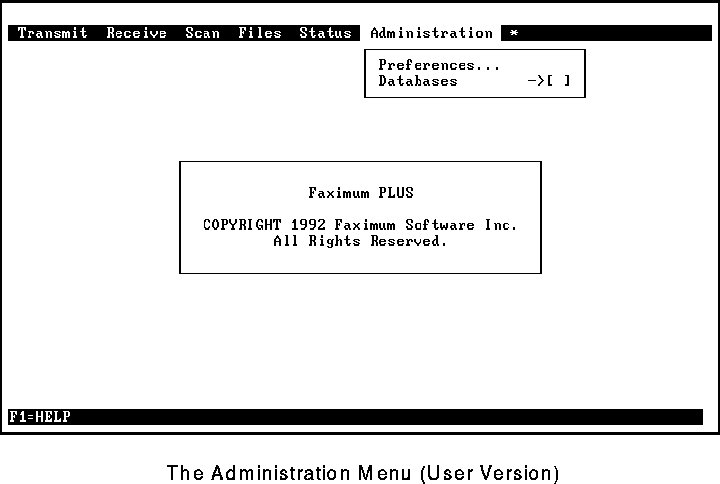
If you are not an authorised Faximum administrator, then the Administration menu will look like Figure 78.
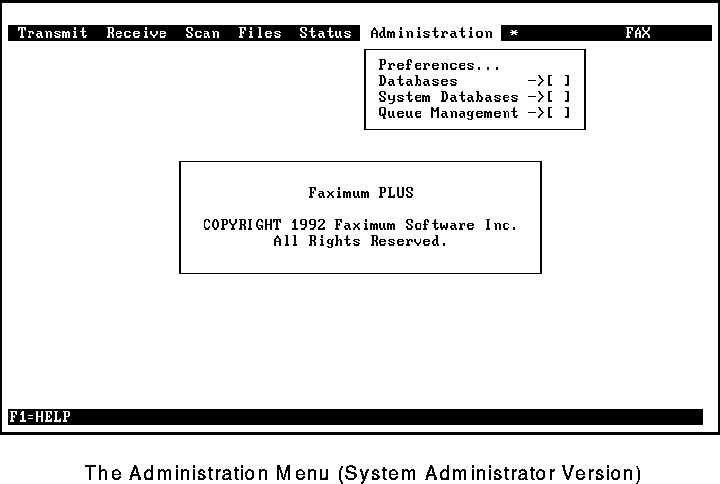
If you are an authorised Faximum system administrator, then the Administration menu will look like Figure 79. (Note the additional two menu items.)
The possible menu items include:
Preferences
This enables you to modify the behaviour of Faximum to best suit your personal requirements.
Databases
This permits you to modify the contents of your People, Company, and Database databases and to create new (empty) People and Company databases.
Systems Databases
This permits the Faximum administrator to modify the contents of the system databases and configuration tables.
Queue Management
This permits the Faximum administrator to examine and cancel queued fax requests.
Preferences
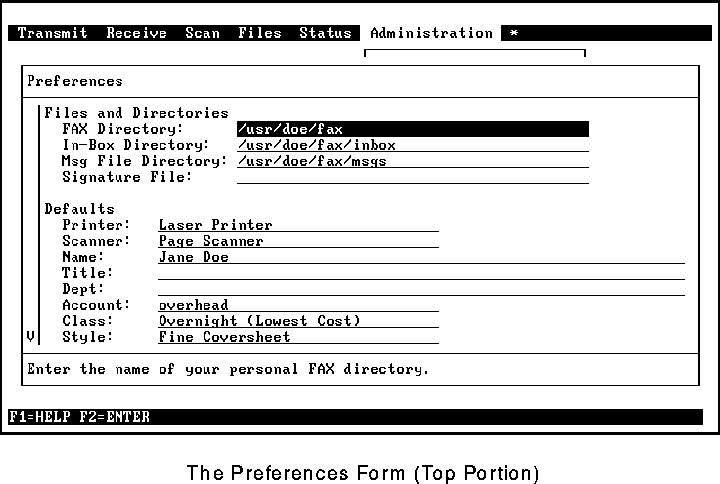
This function permits you to define your personal defaults and parameters. These settings apply only to you (or other users who use the same login account). This form contains more information than can fit on the screen at one time; Figure 80 shows the top part of the form and Figure 81 shows the bottom of the form. (To access the rest of the form, use the down arrow key, or press PgDn.)
The fields in this form are as follows.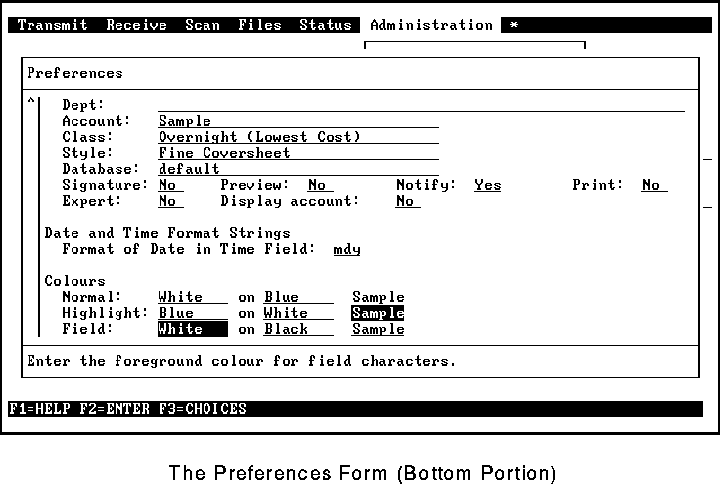
FAX Directory
This defines where your Faximum-related files are stored. This value is set when you first run Faximum, and usually does not need to be changed.
In-Box Directory
This tells Faximum which directory to display when you select the Fax In-Box item from the Receive menu. Note that it does not affect where incoming faxes are put-that is done by the dispatch and action databases.
Msg File Directory
This specifies the directory in which message files are to be stored by default. This is used to generate a new message file path name automatically when F5 is pressed in the Message field of any of the Send a Fax forms.
Signature File
This is a TIFF file that contains your signature. This image is automatically appended to the cover sheet if the Signature option is selected when sending the fax. (Refer to "Signature Files" on page 121 for more information on how to create such a file.)
Printer
This specifies the default printer to use when printing fax images.
Scanner
This specifies the default scanner to use when Faximum is asked to scan a document.
Name, Title, and Department
These fields specify the default name, title, and department to use when filling out the Quick Fax or Fax to Many People forms. This information ultimately appears on the cover sheet of faxes sent by you.
Account
This specifies the default account to which your faxes should be charged.
Class
This specifies the default class of service to use when you submit a fax for transmission.
Style
This specifies the default style to use when you send a fax.
Database
This specifies the default database (people/company pair) to use when Faximum is started. You may change the current database at any time by pressing F5 (CHG DB) while sending a fax, or by selecting the Change Current Database option from the Administration/Database menu.
Signature, Preview, Notify, and Print
These fields specify the default values for the fields of the same name that appear in the Quick FAX or FAX to Many People forms.
Expert
This specifies whether to use the short or long format for the Send a Quick FAX form. (See "Quick FAX" on page 43.)
Display Account
This specifies whether or not the Account field is to be displayed in the simpliefied Send a Quick FAX form or the FAX to Many People form. Note that if accounts are required (see "Account Required" on page 103) then the Account field will be displayed regardless of the setting of this parameter.
Format of Date in Time Field
This specifies the order of the day, month, and year in dates of the form `2/10/91' when used in the time field in the Send a FAX form.
Normal (Colours)
This allows you to specify how normal text should be displayed on colour monitors.
Highlight (Colours)
This allows you to specify how highlighted (or selected) text should be displayed on colour monitors.
Field (Colours)
This allows you to specify how fields within forms should be displayed on colour monitors.
Databases
These functions permit you to add, edit, and delete entries in the People, Company, and Database databases. You may also create new (empty) People and Company databases.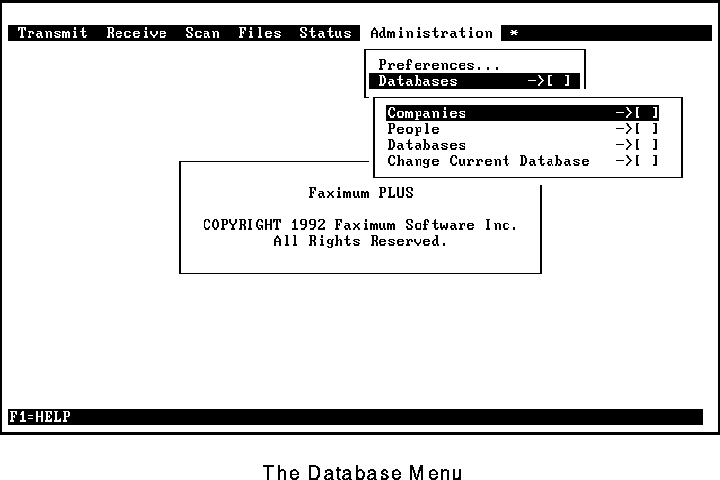
Selecting the Databases item displays the cascading menu shown in Figure 82.
The Companies and People items of this menu permit you to access the current company and people databases. The Databases item provides access to your list of databases, and the Change Current Database item allows you to change the current database (people/company pair).
The operations of adding, editing, and deleting entries are similar for both the people and company databases. On the following pages, database operations are shown for the people database only.
Adding a New Entry
The form that appears after selecting the People entry from the cascading menu depends on whether the current people database is empty or not. If the database is empty, you will see a display similar to Figure 83.
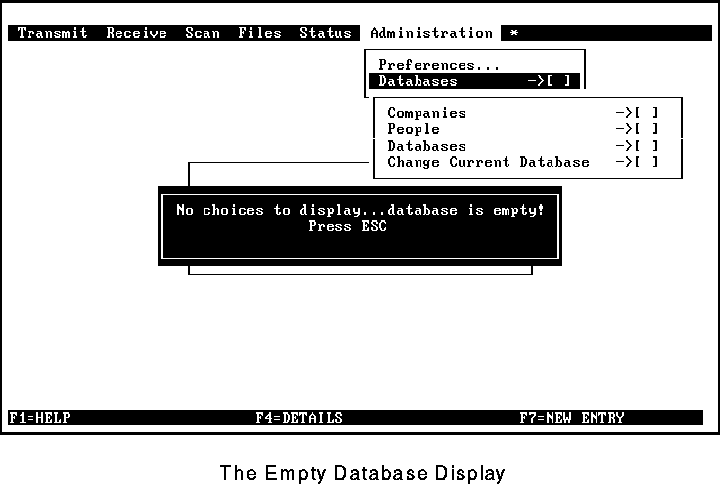
After you press ESC, a blank form appears, allowing you to enter the information on the new entry (Figure 84). Once the information is complete, press F2 to add the entry to the database.
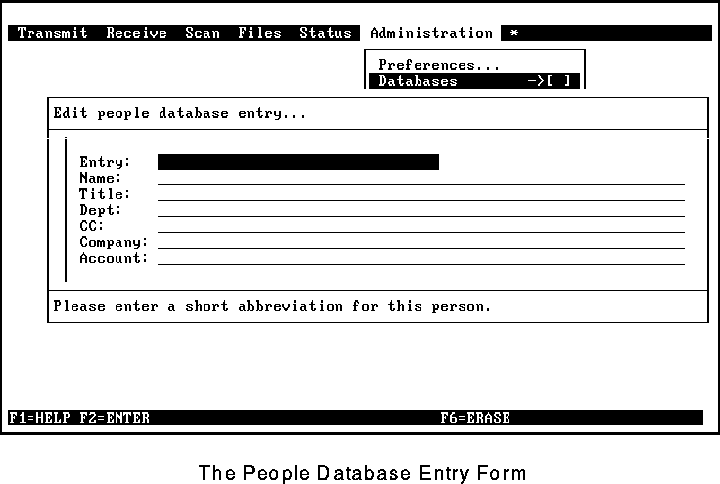
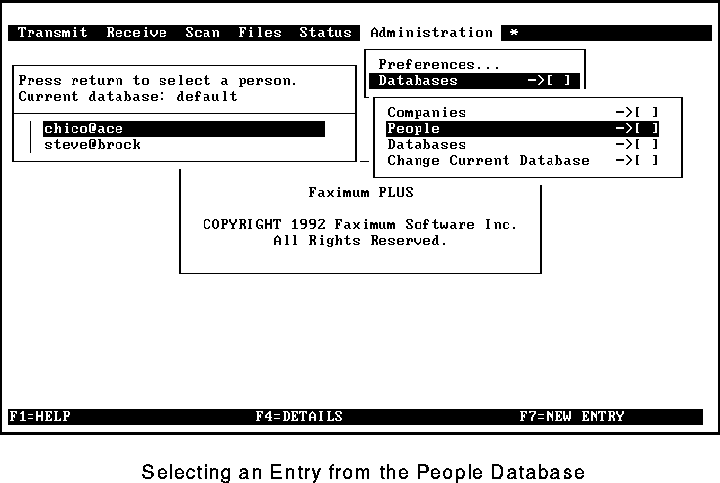
If the database is not empty, you will see a display similar to Figure 85 listing the current entries. You may either select an entry to edit (as discussed in the next section) or press F7 to enter a new entry and obtain a blank form (see Figure 84).
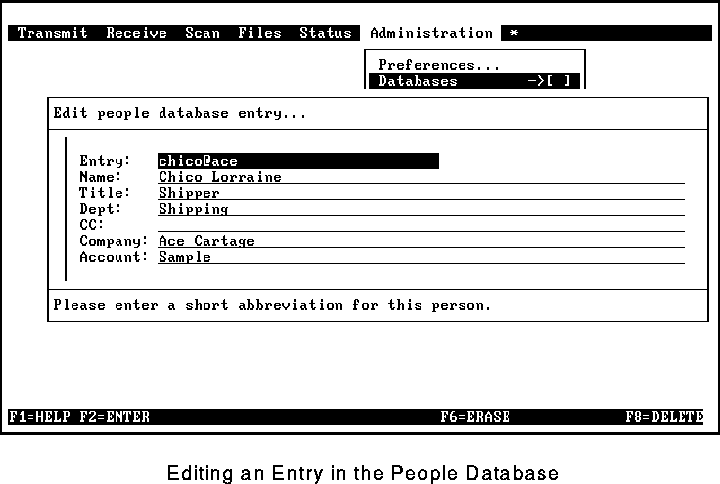
Editing an Entry
To edit an existing entry, select it from the list (see Figure 85) and press Enter. The entry is then displayed (see Figure 86). After you make the desired changes, press F2.
Deleting an Entry
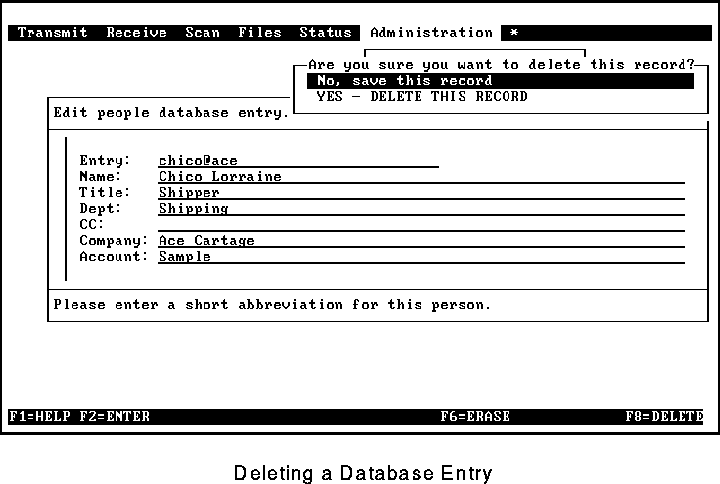
To delete an existing entry, select it from the list (see Figure 85) and press Enter. After you have visually confirmed that this is the entry you wish to delete, press F8. You are then prompted to confirm the deletion (see Figure 87).
Adding New People and Company Databases
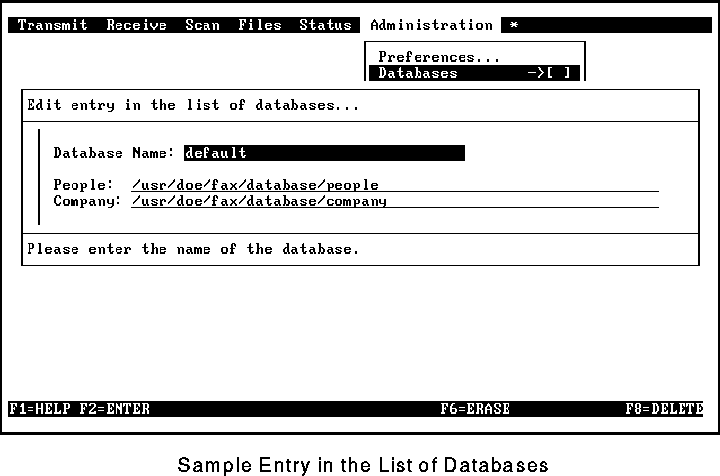
Selecting the Databases option from the cascading Databases menu (see Figure 82) enables you to create and manage new people and company databases.
To create a new people and company database, press F7 once the list of databases is displayed. This will display an empty form in which you may add the path names of the files to contain the people and company databases. The file names ought to be no longer than ten characters (after the final /) and the people and company names must be unique (see Figure 88).
Should you wish to create a shared people and/or company database, the steps are simple:
1. Have one user create a new people and company database.
2. Ensure that the permissions on these new files enable other users to access them.
3. Have all other users who wish to access these databases create new database entries referencing these existing database files.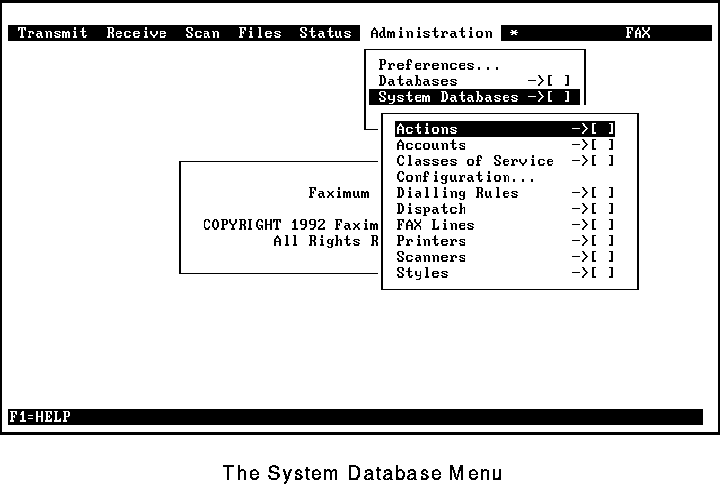
System Databases
This cascading menu gives the Faximum administrator access to the system databases (see Figure 89). For more information on the various system databases, please refer to Chapter 2.
Most of these database functions work in a manner similar to those described in the earlier section on databases (See "Databases" on page 94.) and will not be discussed further.
The only functions that differ somewhat are the Configuration, Dialling Rules, and FAX Lines options. These are discussed below.
Configuration
This option permits the administrator to configure the fax system. Individual fields are described below (see Figure 90 and Figure 91):
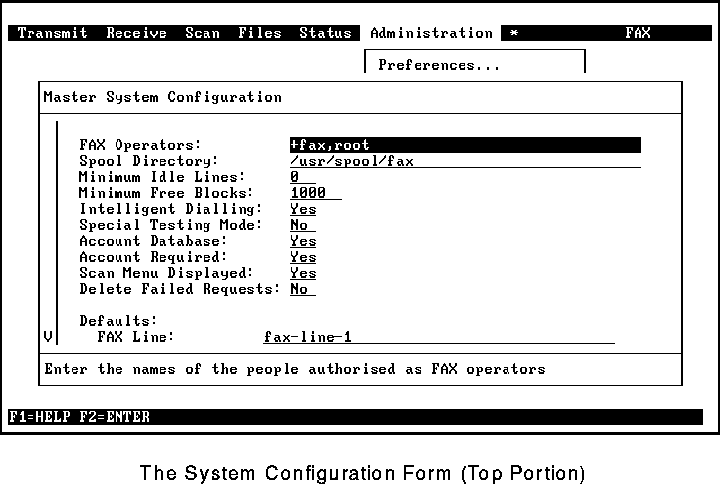
FAX Operators
This determines which users will have access to the Faximum management options in the administration menu. (Normally, end-users do not see the System Databases and Queue Management options.) Typically, root, fax and your system administrator(s) would be listed here.
This list is also used when the Faximum sends E-mail messages regarding its operations as a whole.
Spool Directory
This defines the location of the Faximum spooling area. By default, the directory /usr/spool/fax and the necessary subdirectories are created automatically during installation. (This is usually not changed.)
Minimum Idle Lines
This permits you to ensure that some lines are always left idle for incoming faxes in a multi-line system. (On a single line system this parameter must be 0).
Minimum Free Blocks
This defines the minimum number of free blocks in the file system that contains the spool directory before Faximum will answer an incoming call. This prevents Faximum from attempting to receive a fax when there is insufficient disk space to store it. It also prevents Faximum from consuming all of the available disk space and thereby affecting the operation of other software that may be running on the system.
Intelligent Dialling
This determines whether Faximum is to use intelligent dialling.
With intelligent dialling, all phone numbers are fully qualified and consist of four parts: the country code, the area code, the exchange, and the number. Faximum uses this information to determine if it is a local or long distance call, and when to send the fax to obtain lower telephone rates. In addition to the cost savings, intelligent dialling means that `Company' databases can be shared between different locations in a company without having to edit the phone numbers (e.g., add or delete area codes).
While intelligent dialling can reduce telephone charges significantly, it does require the system administrator to enter information about all of the telephone exchanges that can be reached with a local phone call.
For users who do not need this feature it is possible to disable intelligent dialling and avoid having to enter the necessary information in the dialling rule database. When intelligent dialling is off, Faximum dials all telephone numbers exactly as entered.
Special Testing Mode
When Faximum submits a fax to be sent, it records the details of the request in a file in the /tmp directory and then starts another process to actually handle the request. Normally, these files are deleted once the background process has finished with them. If Special Testing Mode is enabled, these files are not deleted. This can assist in diagnosing obscure problems with Faximum and can also be helpful when you want to examine the format of API requests made by Faximum to the fax scheduler. (Normally, Special Testing Mode should be turned off.)
Account Database
Accounts can be used to record and allocate long distance calls to certain projects or clients. Accounts can also be used in conjunction with the dialling rules to dial an account number as part of the phone number when placing a long distance call. Faximum allows the administrator to use the account database or any arbitrary name as an account.
With the account database the administrator can: (a) restrict users' access to specific accounts; (b) include an account number in the phone number when dialled; and (c) limit acceptable account names to only those in the database. The use of the account database is enforced if the Account Database configuration parameter is set to Yes.
Some organisations have hundreds of accounts and may not want to restrict users or to use account numbers. To allow users to enter an arbitrary name as an account, "freestyle" account names are permitted if the Account Database configuration parameter is set to No.
Account Required
If this field is set to Yes then the Quick Fax form (see "Quick FAX" on page 43) will include the Account field and Faximum will require that the field be completed before the fax is accepted. If the field is set to No then the field will only be displayed in the simplified form if the user has so requested in the preferences form (see "Display Account" on page 93). In any case, the Account field is always accessible through the long form.
Scan Menu Displayed
This field allows the administrator to remove the Scan option from the menu bar on systems that do not have a scanner installed.
Delete Failed Requests
Normally Faximum deletes any request that has not been successfully sent after retrying the fax for the number of times specified in the class of service database. If this field is set to No then failed requests are not deleted but rather suspended, and can be reactivated by the administrator (see "Queue Management" on page 113).
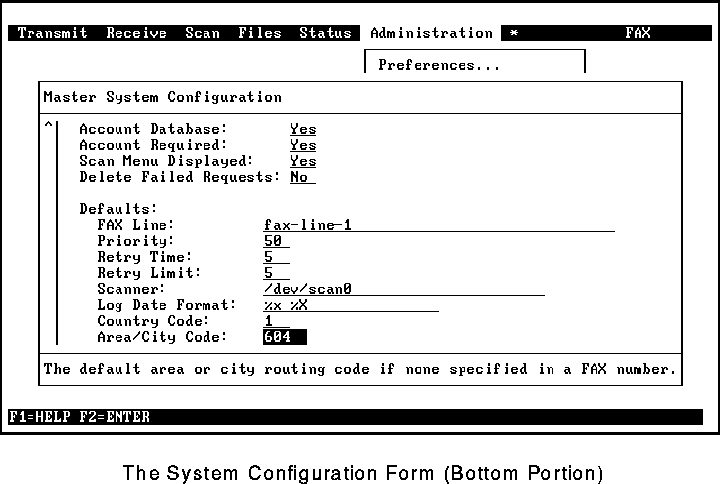
Defaults
The remaining fields contain default values that are used by Faximum.
Note that the Retry Time and Retry Limit specified in a class of service will override the defaults specified for the system configuration (see "The Class Database" on page 15).
Dialling Rules
As described in detail in "The Dialling Rule Database" on page 30, the dialling rules provide the information Faximum needs to distinguish local from long-distance calls and to determine when the phone rates change.
The dialling rules are only used when intelligent dialling is enabled. While there are many benefits associated with intelligent dialling (see "The Dialling Rule Database" on page 16), administrators may wish to forgo the benefits in order to avoid the work involved in setting up the dialling rules. See "Configuration" on page 100 for information on disabling intelligent dialling.
For the most part, editing this database is relatively straightforward and is done in the same manner as the other databases. Figure 92 shows a blank Dialling Rule form.
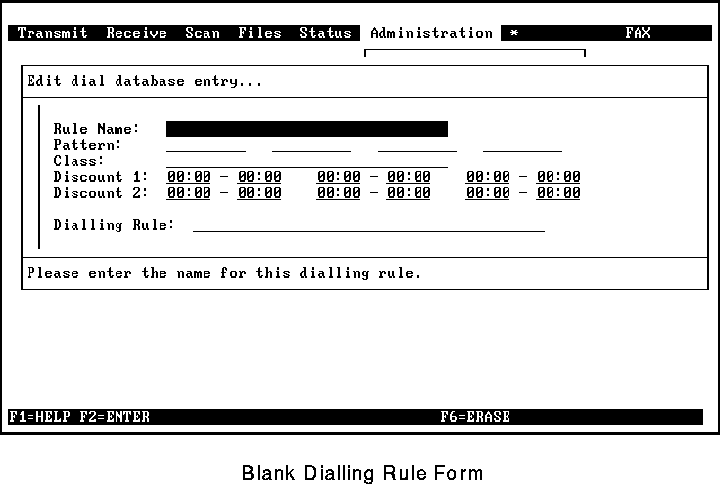
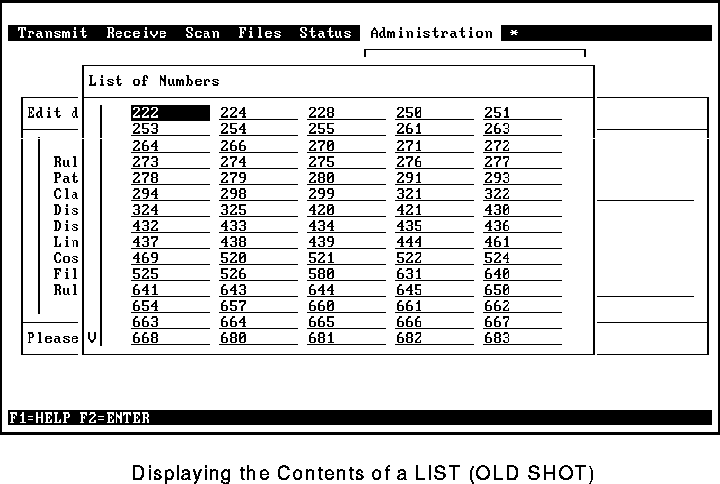
The first part of the form specifies the phone number pattern to which this rule applies. Any one of the four pattern fields may be multi-valued; instead of containing a single number, a field can contain a list of numbers. In Figure 93, the highlighted field contains the <LIST> designator. For example, This might be used to specify all of the exchanges that are local to the system.
To mark a field as being multi-valued (only one of the four pattern fields may be multi-valued), press F5. To edit the list, highlight the field containing the <LIST> designator and press F4 (see Figure 94).
This list may be entered in any order, and with duplicates and/or blank fields. Faximum will automatically remove the duplicates and blank entries and then sort the remaining entries.
 It is very important that each entry in a list be of the same length. For a list of exchanges this will not be a problem. A list of country codes, however, may present challenges in which case a separate rule for each length of country code is required.
Normally at least four dialling rules should be defined:
1. The Local Dialling Area Rule
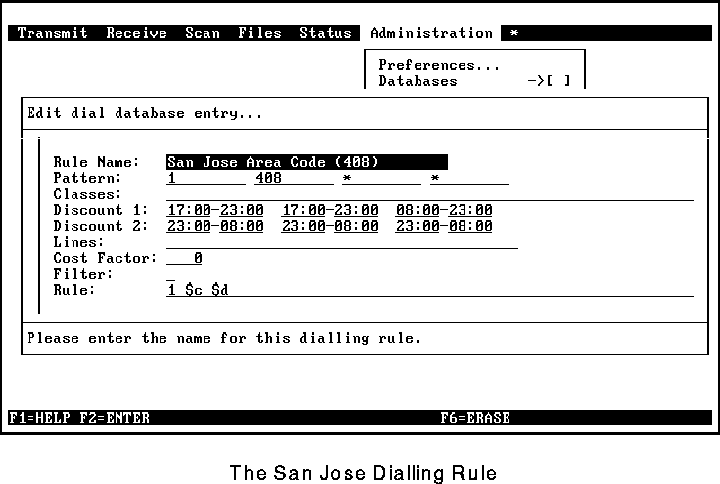
This identifies phone numbers that are local to Faximum (i.e. phone numbers that can be dialled without a long-distance prefix). For example, if the local area code is `408' and the exchanges that can be dialled without using a long-distance prefix are `223', `224', `225', `678', and `987', then the pattern part of the rule would be `1 408 <LIST> *' with the list containing the local exchanges `223', `224', `225', `678', and `987'.
The rule part would be `$c $d'. Figure 93 and Figure 94 show the local dialling area rule for Vancouver.

2. The Within-Area-Code Rule
This identifies long distance numbers within the area code. If the local area code is `408', then the pattern part of the rule would be `1 408 * *' and the rule part would be `1 $b $d' (see Figure 95).
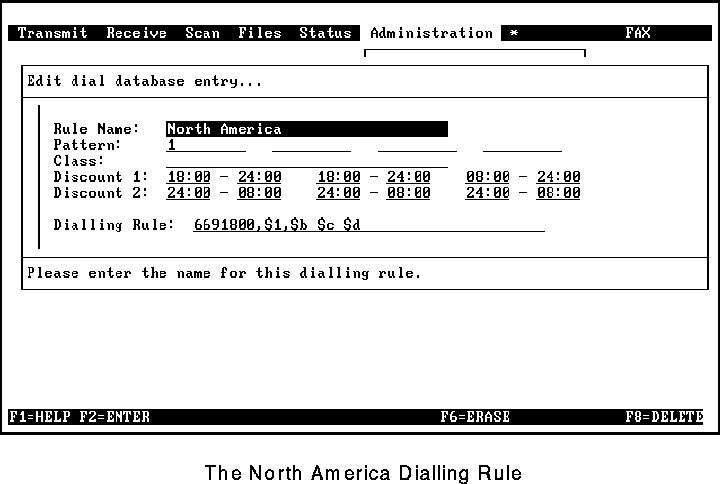
3. The Within-Country Rule
This identifies long distance numbers within the country. For North America, the pattern part of the rule would be `1 * * *' and the rule part would be `1 $b $c $d' (see Figure 96).
4. The International Rule.
This identifies long distance numbers outside the country. The pattern part of the rule would be `* * * *' and the rule part would be `011 $a $b $c $d' (see Figure 97).
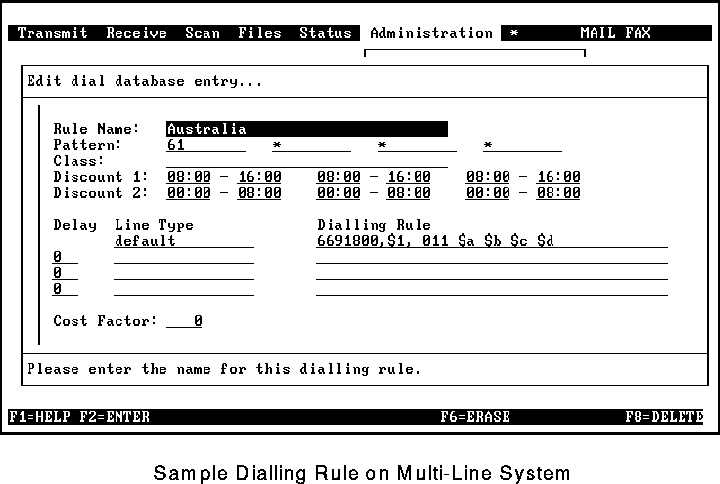
In this dialling rule, we have made some general assumptions about the periods during which the telephone rates are discounted (we have used the periods for Europe). If you plan to send faxes to countries that have different telephone discount periods, then you ought to create special dialling rules for those countries.
Let us use Australia as an example. Assume that from our location, the first discount period for Australia is 8 am - 4 pm and the second discount period is midnight - 8 am. Since the country code for Australia is `61', the dialling rule would look something like Figure 97. This figure also shows an example of a Dialling Rule on a multi-line system.
FAX Line Configuration
This function permits the Faximum system administrator to configure the parameters that affect each fax line (board). (Normally these values are set during installation, and need not be changed.)
If you have more than one fax line connected to your computer, you are asked to select the fax line that you wish to configure.
The exact format and content of this form depends on the fax modem(s) that are installed on your system. This section describes the display for the Complete FAX/9600 modem while the next section describes the display for external Class 2 modems such as the Everex and MultiTech modems. (If your system has other modems installed, please refer to the Installation Guide and Release Notes for additional information.)
The Complete FAX Board
The screens that illustrate the configuration for the Complete FAX Board are shown in Figure 98 and Figure 99.
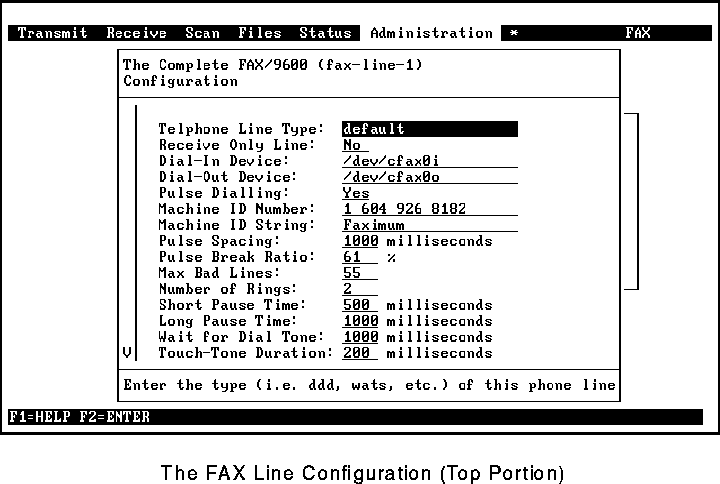
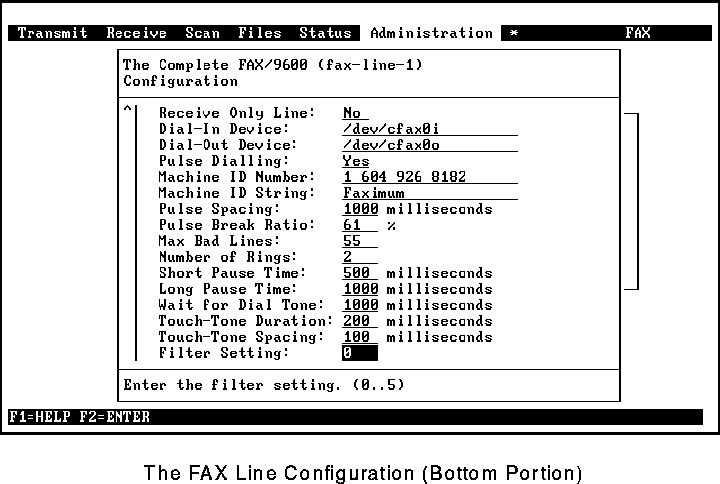
The fields are described below:
Telephone Line Type
This specifies the category of the telephone line. If Faximum has only one line, then it must be of type `default'. If Faximum has more than one line, then this field may be used to divide different types of lines (normal, WATS, FX, etc.) into different categories so that the dialling rules will cause Faximum to use the most economical type of line for each call. (For more information, See "The Dialling Rule Database" on page 30..)
Receive Only Line
This specifies whether the line is to be used only for incoming faxes (if the value is `Yes') or for both incoming and outgoing faxes (if the value is `No'). On multi-line systems, it is sometimes desirable to reserve one or more lines for incoming calls so that a broadcast to many destinations does not tie up all lines and prevent incoming calls from being received.
It is also possible to prevent saturation of all lines during a broadcast by using the Minimum Idle Lines parameter in the configuration menu (See "Configuration" on page 100.).
Dial-In Device
This is the name of the device that is used by the software to access incoming faxes from this board.
Dial-Out Device
This is the name of the device that is used by the software to send faxes using this board.
Pulse Dialling
This specifies whether pulse or tone dialling is to be used on this line.
Machine ID Number
This specifies the numeric station ID string that is to be transmitted by the fax board when identifying itself to other fax machines.
Machine ID String
This specifies an optional alphanumeric ID string that is supported by some fax modems.
Pulse Spacing
This specifies the time to wait between dialling digits (if pulse dialling has been selected). The default value of 100 works with most telephone systems, and should be changed only if the board is connected to a telephone system with specific requirements.
Pulse Break Ratio
This specifies the contact make/break ratio for pulse dialling. The default value of 61% works with most telephone systems, and should be changed only if the board is connected to a telephone system with specific requirements.
Max Bad Lines
Noise and other impairments on telephone lines can cause received fax images to become distorted. Each image consists of almost 100 (standard or low resolution) or 200 (fine or high resolution) scan lines per inch. This field specifies how many lines per page may be scrambled before Faximum considers the received fax unusable and hangs up the phone.
Number of Rings
This field specifies how many times the phone should ring before the call is answered.
Short Pause Time
This specifies how long to wait when the short pause character (`,') is encountered in a telephone number being dialled.
Long Pause Time
This specifies how long to wait when the long pause character (`;') is encountered in a telephone number being dialled.
Wait for Dial Tone
After "picking up the phone", this field specifies how long Faximum should wait before dialling.
Touch-Tone Duration
This specifies how long to emit a touch-tone dialling sound. The default value of 200 works with most telephone systems, and should be changed only if the board is connected to a telephone system with specific requirements.
Touch-Tone Spacing
This specifies how long to wait between dialling touch-tone digits. The default value of 200 works with most telephone systems, and should be changed only if the board is connected to a telephone system with specific requirements.
Filter Setting
This specifies the default filter value to use. The default of `0' usually works best, but if problems are experienced communicating with fax machines over long distance, increasing this value may help. Increasing this value improves long distance communications quality at the expense of local call quality.
The External Class 2 (EIA-592) Modems
The screen that illustrate the configuration for external Class 2 (EIA 592) fax modems is shown in Figure 98.
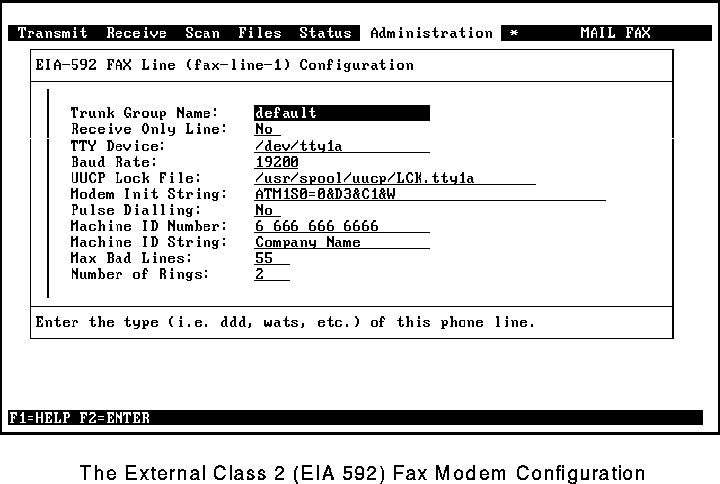
The fields are described below:
Telephone Line Type
This specifies the category of the telephone line. If Faximum has only one line, then it must be of type `default'. If Faximum has more than one line, then this field may be used to divide different types of lines (normal, WATS, FX, etc.) into different categories so that the dialling rules will cause Faximum to use the most economical type of line for each call. (For more information, See "The Dialling Rule Database" on page 30..)
Receive Only Line
This specifies whether the line is to be used only for incoming faxes (if the value is `Yes') or for both incoming and outgoing faxes (if the value is `No'). On multi-line systems, it is sometimes desirable to reserve one or more lines for incoming calls so that a broadcast to many destinations does not tie up all lines and prevent incoming calls from being received.
It is also possible to prevent saturation of all lines during a broadcast by using the Minimum Idle Lines parameter in the configuration menu (See "Configuration" on page 100.).
TTY Device
This is the name of the tty port device that is connected to the external fax modem.
Baud Rate
This is the speed used to communicate with the modem. If the speed is other than 19200 Faximum may not be able to receive faxes reliably.
UUCP Lock File
This defines the lock file used to ensure that UUCP or cu do not attempt to use the modem when Faximum is using it.
Modem Init String
This specifies the modem commands that are to be sent to the modem when starting to send or receive faxes.
Pulse Dialling
This specifies whether pulse or tone dialling is to be used on this line.
Machine ID Number
This specifies the numeric station ID string that is to be transmitted by the fax board when identifying itself to other fax machines.
Machine ID String
This specifies an optional alphanumeric ID string that is supported by some fax modems.
Max Bad Lines
Noise and other impairments on telephone lines can cause received fax images to become distorted. Each image consists of almost 100 (standard or low resolution) or 200 (fine or high resolution) scan lines per inch. This field specifies how many lines per page may be scrambled before Faximum considers the received fax unusable and hangs up the phone.
Number of Rings
This field specifies how many times the phone should ring before the call is answered.
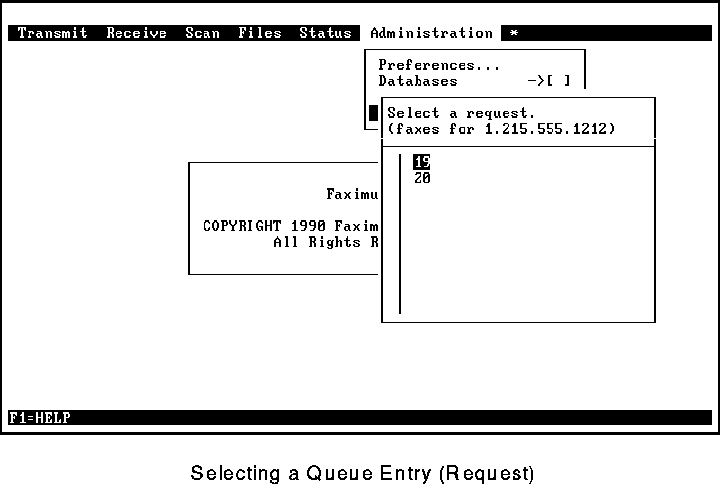
Queue Management
This function permits the Faximum system administrator to:
The first step is to select the destination queue that you wish to examine (Figure 101). (If only one destination currently has a queue, then you are not asked to select a destination.) Destination queues are named using the telephone number.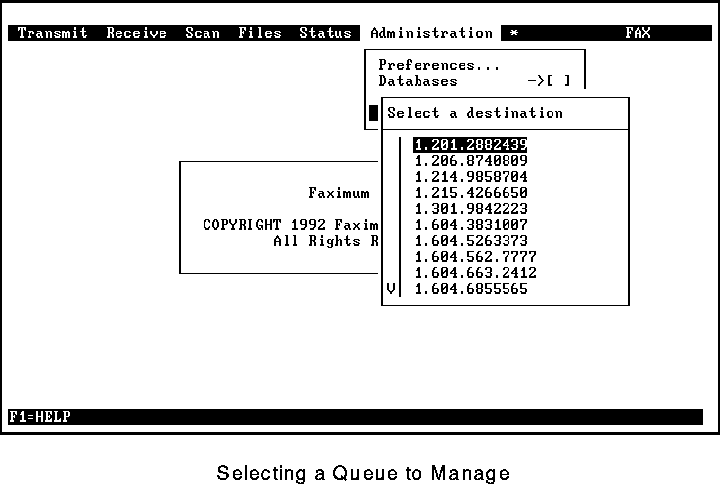
The next step is to select the request that you wish to examine/delete (see Figure 102). Note that all requests are assigned an arbitrary sequence number. (If only one request is in the queue, then you are not asked to select a request.)
The details of the request are then displayed (see Figure 103).
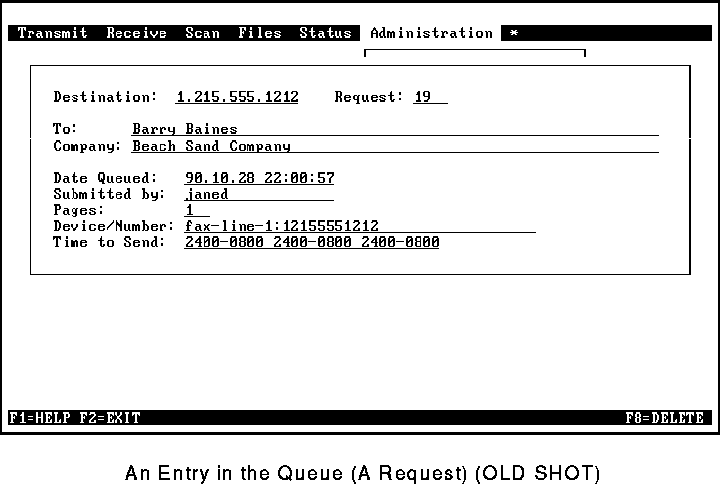
At this point you can:
A request may be suspended either manually (using Queue Management) or automatically by the system (if Delete Failed Requests is set to no-see page 103).
[Top] [Prev] [Next] [Bottom]
support@Faximum.com
Copyright © 1996, Faximum Software Inc. All rights
reserved.